Feeds:
Posts
Comments

Archive for the ‘Bars & Brownies’ Category

Yes, I’m sharing something with a little green in it just in time to celebrate St. Patrick, but these amazing brownies can be made any time of year.

Truthfully, I was nervous about making them.  You see my friend Denise already makes what I consider to be a perfect mint brownie.  So why would I waste my time making something that couldn’t possibly compete?  I dunno.  Curiosity I guess.

The good news is that this recipe is different enough from my friend’s that I now have two favorites.  The most notable difference is in the brownie layer: this recipe’s brownie layer is definitely more thick, which, in the end, yields a taller brownie.  But the taste…well, it’s equally as good as my first favorite.

I recently took these to a baby shower and knew they were a sure success when one of the attendees declared, “These are even better than the BYU mint brownies.”  You alumni know what she’s talking about.  The chocolate and mint really become best friends in this recipe and make the most delicious sweet treat.

So, bookmark, pin, or just get into your kitchen to make some mint brownies.  You won’t be disappointed!

Mint Brownies
adapted from SavvyGirl & Company

printer friendly recipe

For the brownie layer:
2 cups sugar
1 cup butter, softened
4 eggs
4 (1-ounce) squares unsweetened chocolate, melted and slightly cooled
2 ½ cups flour
¼ teaspoon salt
¼ teaspoon baking powder
2 teaspoons vanilla

Mint Frosting:
4 tablespoons butter, softened
2 tablespoons evaporated milk
2 cups powdered sugar
½ teaspoon peppermint extract
1 teaspoon vanilla extract
Few drops green or red food coloring

Glaze Topping:
6 tablespoons butter
1 cup semi-sweet chocolate chips
2 teaspoons vanilla

Heat oven to 325.  Grease a 9×13 baking pan.  In large bowl, cream sugar and butter until fluffy. Beat in eggs until well-blended; then add melted chocolate. Mix dry ingredients and add to creamed mixture along with vanilla.

Bake for 28-32 minutes, or until no imprint is left when touched or a toothpick inserted into the center comes out clean. Do not overbake.

Mix mint frosting ingredients until creamy and spread on cooled brownies. Refrigerate 1 hour.

For glaze, combine butter and chocolate chips in top of double boiler. Add the vanilla and blend thoroughly. Pour gently over the mint frosting and spread by tipping pan; refrigerate until glaze is set.

Read Full Post »

Lemon Bars

I know, not very Valentine-ish.

That’s coming on Friday (or maybe Saturday, we’ll see).  But these are definitely worth sharing.

A few weeks ago the weather turned cold and fearing that all of her citrus would freeze, my mom went outside on a frigid dark night and picked nearly everything off of her meyer lemon tree.  She had lots of fruit to share.  In fact, if you’re close by and want some lemons, let me know.  I’ve still got more than I can use.

I put those lemons to good use when my sweet friend Kristen came to town.  I had to take her a Double Batch treat, right?  Meeting her little girl Evelyn was way sweeter than any treat I could have made.  Nevertheless, these are pretty delicious.

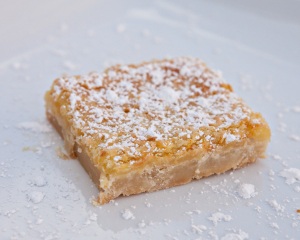
Yes, you could buy a mix at the store and make lemon bars, but WHY when the assembly is so easy and quick and the results are SO. MUCH. BETTER.

Give them a try, and seriously, if you want a few lemons to get you started, let me know! 🙂

Lemon Bars
adapted from Lion House Desserts   

printer friendly version

1 ¼ cup butter
1 teaspoon vanilla extract
2 ¼ cups all purpose flour
½ cup powdered sugar

4 eggs
2 cups sugar
6 tablespoons lemon juice
zest from one lemon
4 tablespoons all purpose flour
1 teaspoon baking powder

To make the crust:
Heat oven to 350.  Put butter in mixing bowl and beat until softened.  Stir in vanilla.  Add the flour and powdered sugar and mix on low speed until just combined.  Spread the dough evening into a 9×13 pan.

Bake for 10 minutes or until the corners are light golden brown.  Remove from oven and pour filling on top of crust.

For the filling:
Mix together the eggs, sugar lemon juice, zest, flour and baking powder with a wire whisk or on low speed of a mixer.  It is important not to mix a lot of air into the filling.  Pour on top of the partially baked crust and bake for 30 to 35 minutes.

Remove from oven and all our to cool slightly before dusting with powdered sugar.  Cut into bars and serve.

Read Full Post »

Take a look at that: cheesecake sandwiched perfectly between two layers of cookie.

The result? Well, it’s just a bit of deliciousness that takes on a mean addiction.  Just eating one to sample was nearly impossible.

I’ve done the cheesecake and chocolate chip cookie combination before.  This recipe, however is far more focused on the cookie with a little bit of cheesecake.  I like that.  Wait, I liked the other one too.

What can I say? It’s just a good combination.

Make a double batch and really spread some holiday sweetness to those you love!

Cheesecake Chocolate Chip Cookie Bars
adapted from King Arthur Flour

printer friendly version

Chocolate chip cookie layer:
1/2 cup unsalted butter, softened
1/2 cup butter flavored vegetable shortening
1 cups brown sugar
1/2 cup granulated sugar
2 teaspoon vanilla extract
3/4 teaspoon salt
1 tablespoon apple cider vinegar
1 egg
1 teaspoon baking soda
2 cups all-purpose flour
2 cups semisweet chocolate chips

Cheesecake layer:

1 package (8 oz) cream cheese, room temperature
1/2 cup sugar
1 egg
1/2 teaspoon vanilla

Heat oven to 350. Cream together the butter, shortening, sugars, vanilla, salt and vinegar. Beat in the egg, then the baking soda and flour. Stir in the chocolate chips. Divide the dough into two equal portions and set aside.

In a medium mixing bowl cream the cream cheese with the sugar until thoroughly combined. Beat in the egg and vanilla.

In a 9×13 pan, spread 1/2 of the cookie dough mixture evenly across the bottom.
* This is a tricky step.  Be patient with the process.  It’s not like you’re pouring cake batter in.  Remember, this is cookie dough…and the chocolate chips are no help when it comes to spreading the dough out.

Spread the cream cheese mixture on the top of the cookie dough. With the remaining cookie dough, flatten chunks of dough between your hands into discs, and then place on top of the cream cheese mixture. The dough discs don’t have to touch, just place them near each other so they cover the surface as well as possible.

Bake for 30-40 minutes, until the top is brown and cooked through. Cool completely and store in the refrigerator.  Cut into bars and enjoy!

Read Full Post »

Rocky Road Bars

So, I thought I’d take a couple of weeks off from blogging and before I knew it, a couple of months had gone by.  Seriously, how it is possibly almost Thanksgiving?

I have been cooking and baking…just not blogging much.  But I do have to say that this is by far the sweetest pumpkin creation this season:

I’m coming back, just in time for the holiday season with a few new recipes that are simple, but do not disappoint.  Who doesn’t love simple at this crazy time of year?  Thanks for sticking with me.

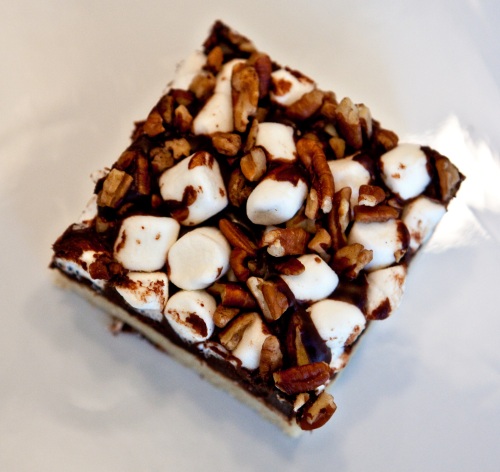
This recipe for Rocky Road bars is rich and delicious.  The shortbread crust balances out the richness of the chocolate just perfectly.

If you’re one of those thoughtful bakers who makes a variety of treats to plate and deliver to friends, consider adding this recipe into your stack of must-bake items for the holidays.

Rocky Road Bars
adapted from King Arthur Flour

printer friendly recipe

For the crust:
1 cup (2 sticks) butter, salted
1/2 teaspoon salt*
3/4 cup sugar
2 teaspoons vanilla extract
2 1/3 cups flour
*If you use unsalted butter, increase the salt in the recipe to 1 teaspoon.

For the topping:
3 cups chopped semisweet or dark chocolate or chocolate chips
3/4 cup heavy cream
1 cup toasted diced pecans
3 cups mini marshmallows

Heat the oven to 300.  Line a 9×13 pan with foil and grease the foil. (Or just grease the pan.  Using foil is a personal preference because then I can lift the foil out and cut the bars easier.)

In a medium-sized bowl, beat together the butter, salt, sugar, and vanilla, then beat in the flour. The dough will seem very dry, and won’t seem to want to become together at first.

Press the dough into the prepared pan, smoothing the surface with your fingers.  Prick the dough all over with a fork to  keep it from bubbling up as it bakes.

Bake the crust for 35 to 40 minutes, or until it’s golden brown around the edges and beginning to brown on the top. Make the topping while the shortbread begins to cool.

Place the chocolate and cream in a microwave-safe bowl, or in a saucepan. Heat in the microwave, or over low heat on a burner, until the cream is steaming and barely beginning to form bubbles.

Remove from the heat, and stir. The chocolate will gradually form a lump in the center of the bowl, then will start to expand as it absorbs the cream. Eventually the chocolate and cream will become one.  Keep stirring until it’s very smooth. It WILL all come together.  If all the chocolate doesn’t seem melted, reheat very briefly, and keep stirring.

Spread the warm chocolate atop the cookie crust. Sprinkle with the marshmallows, then the pecans.

Cover the pan, and place the bars in the refrigerator for about 15 to 20 minutes, to set the chocolate a bit. Using a sharp knife cut into bars.

Read Full Post »

Not much to say about these, except that they’re sweet, rich and addictive.  Just one square doesn’t seem like enough.  You’ll want more, I promise.

Oh, and since I rarely use butterscotch chips and had some extra caramel laying around, I chopped that up instead and tossed it in.

That’s the beauty of bars like this.  Just throw in whatever you like (or whatever happens to be in your pantry) and you’re pretty much guaranteed a success…in about 30 minutes!

Hello Dolly Bars
printer friendly recipe

Ingredients:
½ cup (1 stick) salted butter, cut into large pieces
1½ cups graham crackers crumbs (about 8 graham crackers, pulsed in a food processor)
1½ cups chocolate chips
1 cup butterscotch chips (I used caramel pieces instead)
1 cup shredded coconut
1 cup pecans, coarsely chopped
1/3 cup sweetened condensed milk (just under half a small can)

Heat oven to 350.  Melt the butter in microwave and then add the graham cracker crumbs. Mix and then press evenly into the bottom of 8×8 baking pan.

Layer coconut, pecans, butterscotch and chocolate chips on top of graham cracker base. Pour sweetened condensed milk over whole mixture.

Bake in oven for 25 to 30 minutes or until the top is light brown.

Let cool in pan for at least half an hour, cut into bars and serve.

Read Full Post »

When I bake a cake it’s pretty rare that I turn to a mix to do the job.

Although, some of you might remember from the Easter Basket Cupcakes post,  that when a mix is used, I have a few tricks to make the cake extra delicious.

While Betty Crocker or Duncan Hines don’t end up as a cake in my kitchen very often, I do love using a mix to make all kinds of other sweet creations.  It can be a serious time saver with delicious results.

This recipe starts with a German chocolate cake mix and then just gets better and better with all of the additions.  It’s hard to go wrong with chocolate, caramel, pecans, and a little more chocolate!

Chocolate Caramel Bars
adapted from Better Homes and Gardens

printer friendly recipe

  • 1 package German chocolate cake mix
  • 3/4 cup butter, melted
  • 1 teaspoon vanilla extract
  • 5 ounces (2/3 cup) evaporated milk, divided into 1/3 cup portions
  • 14 ounces caramels
  • 1 cup chopped pecans
  • 1 cup semisweet chocolate chips

Preheat oven to 350. Grease a 9 x 13 baking pan.

Combine cake mix, melted butter, vanilla and 1/3 cup of evaporated milk in a large bowl. Using an electric mixer on medium speed, beat until smooth. Spread half of the dough in baking pan. Set aside remainder of dough.

In a large saucepan, combine caramels and 1/3 cup evaporated milk. Cook, stirring constantly, over medium-low heat until melted and smooth. Pour evenly over dough in pan. Sprinkle with nuts and chocolate chips. Drop remaining dough over the nuts and chocolate.

Bake for 20-25 minutes. Cool in pan on a wire rack and then cut into bars.

Read Full Post »

Snickerdoodle Bars

There was a time, not all that long ago, that I delighted in a challenging recipe.

How long would it take? What techniques and tools would I have to use? And, the ever important, would it actually turn out?

I mean, remember the Santa Cookies or the Chocolate Peanut Butter Cake? Lots of steps, but lots of fun — at least when baking is your hobby.

Well, baking is still a hobby. I do love a new recipe. But little Noah is my new hobby, so those tougher recipes are going to have to wait a bit and collect a little more dust in the pile they’re sitting in.

Again I bring you a quick, but winning treat. I do love a snickerdoodle cookie. I have a great recipe for that too — stay tuned. But when you’re short on time or just don’t want to get out the baking sheets, give this a try. If you’re just dying to have the round cookie shape, get out your cookie cutter and call them cookies!

Snickerdoodle Bars
printer friendly recipe

1 ½ cups flour
1 teaspoon cream of tartar
½ teaspoon baking soda
½ teaspoon salt
½ cup butter, softened
¾ cup granulated sugar
1 egg
1 teaspoon vanilla extract

1 tablespoon granulated sugar
½ teaspoon cinnamon

Heat over to 350.  Grease a square baking pan (8×8 or 9×9 or even a round cake pan).

Whisk together or sift the flour, cream of tartar, baking soda and salt.  Set aside.

Cream the butter and sugar until light and fluffy.  Add the egg and vanilla.  Gradually add the flour mixture.  Spread into pan.  It will be more like cookie dough, so using your fingers to spread the dough will make it much easier.

Combine the sugar and cinnamon in a small bowl.  Sprinkle over the dough.

Bake at 350 for 14-16 minutes, or until a toothpick inserted near the center comes out clean.  Let cool in pan.  Cut into bars and enjoy!

Read Full Post »

No, I have not disappeared completely from blogging.

Yes, I have been baking…without posting the results.

Part of that is pregnancy laziness, busyness and the other part is because I’ve been going back to some of my old favorites and making what I already know I LOVE — um, and crave.  There are plenty of delicious fall sweet treats to indulge in, that’s for sure!

So, to save you from searching through the blog for something seasonally appropriate, here are a few of my fall favorites:

PUMPKIN CHOCOLATE CHIP BREAD…Make it in big loaves or lots of little ones to share with your friends!

PUMPKIN CHOCOLATE CHIP BARS…almost like the bread, but different enough to try as well.  I’ve already made three double batches of this in the past month and wherever it goes, it GOES fast!  Another double batch is going to the Halloween party at church on Saturday.  These are a MUST bake.
IMG_1620

APPLE PIE BARS…I took these to a friend’s baby shower not long ago and they were a hit.  Think apple pie without all the work.  Definitely treat it as apple pie though and serve warm with plenty of vanilla ice cream!

IMG_1726


CARAMEL APPLE BARS…Definitely different than the other apple bars, but if you love that heavenly combination of apple and caramel as much as I do, this recipe is definitely for you.

IMG_1734-1


PUMPKIN SPICE BUNDT CAKE WITH BUTTERMILK ICING…Yum.  Make it a day in advance and it will taste even better the next day.


IMG_1949

Do your family or anybody else who gets to eat your treats a favor: warm up your oven, soften your butter and at least pick one.  You’ll love whatever you choose!

My list of recipes to try is growing faster than I can keep up with!  Hopefully I’ll get to at least one or two before fall turns into winter.   Maternity leave can’t come soon enough!

Read Full Post »

Oreo Fudge Bars

Today I took these to about twenty-five of my favorite teenage girls at church.  If they didn’t love me before, I think we’re ‘BFF’s’ now.
Make them, try them and I dare you to just eat one. They are so rich, so chocolatey, and SO easy!

Oreo Fudge Bars

printer friendly recipe
1 16oz. package of Oreo cookies
1 stick butter, melted
1/4 tsp salt
1 (14 ounce) can sweetened condensed milk
1 teaspoon vanilla extract
3/4 cup semi-sweet chocolate chips
1/2 cup milk chocolate chips (could use another 1/2 cup semi-sweet chips if you like)
1/2 cup mini chocolate chips (or regular, if you’re like me and you don’t always have those mini ones in your pantry!)

Preheat oven to 325. Line a 9×13 pan with foil and lightly spray with cooking spray. Set aside 8 Oreo cookies for the toppings.

In a small food processor grind the rest of the cookies. If you don’t have a food processor, just pound with a rolling pin until the cookies are fine crumbs. Add the salt to the crumbs and stir to combine.

Melt butter and gently stir together with the cookie crumb mixutre. Press firmly into the bottom of the prepared pan. Coarsely chop the remaining cookies into chunks and set aside.

Over a double boiler or in the microwave, melt 3/4 cup semi-sweet and 1/2 cup milk chocolate chips together with the condensed milk and vanilla. Stir frequently until smooth and spread evenly over the prepared cookie crust.

Sprinkle the mini chocolate chips and the Oreo cookies chunks over the top of the filling. Press down gently into the chocolate topping.

Bake for 20-22 minutes oven. Allow to cool on counter for 1 hour. Chill in fridge until completely cold and set before cutting into bars. If you don’t, you’ll have a fudgy mess on your hands!

Read Full Post »

This is one of my mom’s classics. Growing up whenever we’d have a picnic, camping trip or day at the beach she made these brownies. The smell of opening up the tupperware container of brownies is definitely one of my favorites. Oh, and these are good if you need something for a crowd. You could make them in a 9 x 13 pan, but my mom has always done it in a 10 x 15 pan. You can serve quite a few friends that way, and I promise everyone will enjoy!

I think these are best described as a cake-like brownie with delicious chocolatey frosting. I love that such simple ingredients like butter, powdered sugar, cocoa and a little milk can make such a finger licking frosting treat.

On my mom’s original recipe, she doesn’t give any measurements for the frosting, so I’m giving you approximate amounts. It all depends on how much frosting you want on your brownies. But if you have extra, might I make a suggestion? Have some graham crackers on hand and spread some frosting on them to make little sandwiches. You can even put them in the freezer (you can do that with the brownies too!) to have as a sweet snack some other time!

And a note from Nate: these brownies are extra delicious served cold, straight out of the refrigerator or even the freezer.  Give it a try!

Mom’s Frosted Brownies
courtesy of my mom

printer friendly recipe

2 1/2 cups sugar
1 1/2 cubes butter or margarine, softened
1/2 cup shortening
6 eggs
1 tsp. vanilla
2 cups flour
3/4 cup cocoa
1/2 tsp. salt

Heat oven to 350. Grease a 10 x 15 pan. Cream sugar, butter and shortening. Add eggs one at a time and vanilla. Mix in flour cocoa and salt.
Pour into greased pan and bake for 25 – 30 minutes. Let cool completely before frosting.

Frosting:
16 oz. (1 box) powdered sugar
1/2 cube butter, softened
1 tsp vanilla
1/4 cup cocoa powder
milk

Mix together the powdered sugar, butter and vanilla. Add in cocoa powder and start with 2-3 tablespoons of milk. Add in more milk 1 tablespoon at a time until frosting has reached desired consistency. You can also add in a little more cocoa if you want your frosting to be more chocolately. Mix all ingredients completely. (One thing my mom taught me is the longer you beat the frosting the lighter and more whipped it will be. I usually let it mix in the Kitchenaid for about 5 minutes.)

Once the frosting is finished, spread onto cooled brownies.
Don’t discard the extra frosting! Get out those graham crackers and make some dessert sandwiches!

Read Full Post »

Older Posts »